Tuesday, April 23, 2013

A Couple of Hours in Gastown

I needed to return a book to the Vancouver Public Library (VPL) and while I could have returned it via the Fraser Valley Library System, it was a good excuse to visit Vancouver.

I should have taken the Canon EOS Rebel T3i but I made do with the little rugged Nikon Coolpix and it did a pretty good job.


Iconic curved roof line of VPL meets glass—a lot of glass
I noticed some text in the windows above me and zooming in discovered a hugely-enlarged page from John Milton's Paradise Lost complete with study notes scribbled all over it. I don't think they mean to encourage that to happen to their library books.

Zooming in on Paradise Lost


We walked by the firehall and I'm glad I turned around.

I didn't notice until now the matching mountain in the mural

There were signs of gentrification everywhere I looked.

gen·tri·fi·ca·tion
 [jen-truh-fi-key-shuhn]
noun
1.
the buying and renovation of houses and stores in deteriorated urban neighborhoods by upper- or middle-income families or individuals, thus improving property values but often displacing low-income families and small businesses.
2.
an instance of gentrifying; the condition of being gentrified.

Origin:
1975–80; gentri(fy) + -fication


Here is a condo/apartment building on the site of Woodwards Department Store.

The sky was white due to the rain


What's left of Woodwards

This has got to be the ultimate curio shop. It's called Salmagundi West and I dare you to enter. It's so deliciously creepy.

The sun came out just as we entered which made it seem a little less scary
I'm reluctant to photoshop the brightness out (even if I knew how)


I didn't know that penises (or is the plural penii?) had bones


The proprietor encouraged photography but I asked just to make sure I didn't end up here
 

This photo reminds me of the children's picture books where you're supposed find hidden objects

There was so much to see in this most curious of curio shops and I'm definitely going back, next time with the Canon.

Maybe next time I won't be so creeped out but wait a minute, that was the fun of it!


I couldn't leave Gastown without a stop at one of my favourite places.

I admire the architect's vision to put a window here and that they share it with passersby


Thursday, April 18, 2013

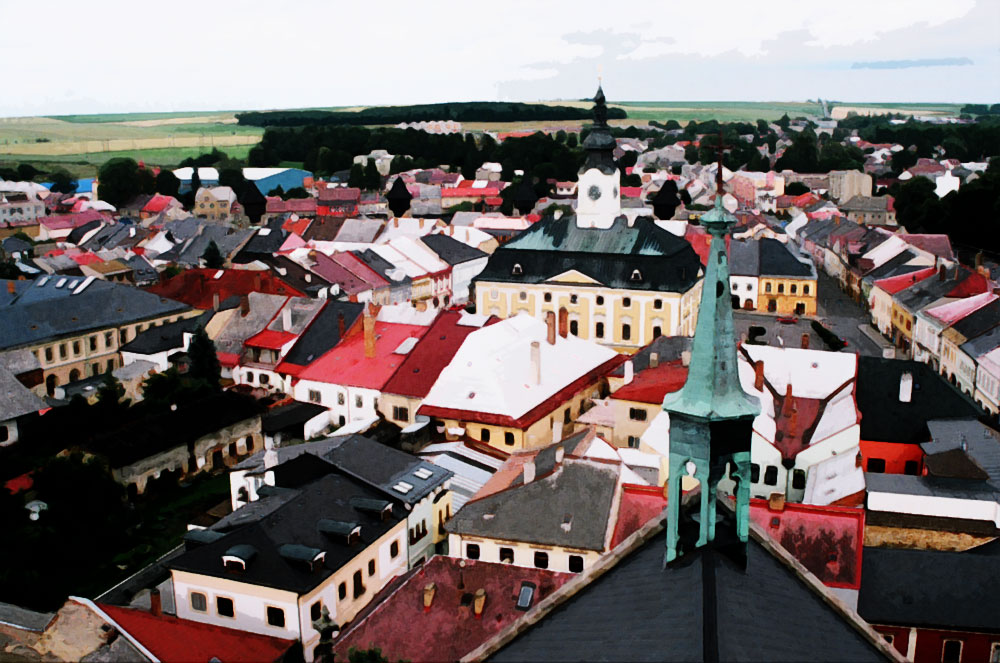
Imitation Landscape Sketch or Hey! I'm a Pretend Artist!

Here's how I turned this:

Policka, Czech Republic 2007

into this:

1. Duplicate Background (as usual)

2. Remove Colour
Image>Adjustments>Gradient Map>Black and White

3. Duplicate Layer

4. Invert Image
Image>Adjustments>Invert

5. Select Blend Mode: Colour Dodge (screen will turn white)

6. Filter>Other>Minimum>1 pixel

Note: Filter>Blur>Gaussian Blur>12 pixels (6-12 pixels work best) is done instead of the above step if you're "sketching" a portrait.

7. Merge layers to a new layer by:
  • (Alt+Shft+Ctrl+E) which is the shortcut, or
  • Layers>Merge to a new layer while depressing Alt key
To Add Colour:

8. Duplicate background layer

9. Move background layer above all others

10. Select Blend Mode: Colour, 50%
I love the dark outlines

Instant Watercolour Painting

Here's how to turn this:

At the Smithsonian Flight Museum, Washington, DC
into this:

Little Butch


Open the photo (will be background).

Duplicate the photo (i.e. the background layer) 3 times.

On the first layer (from the bottom):

Filter>Artistic>Cutout, 4, 4, 2
Blend Mode: Luminosity

layer 1
On layer 2:

Filter>Artistic>Dry Brush, 10, 10, 3
Blend Mode: Screen
layer 2 (including layer 1)
just for fun here's what layer 2 looks like by itself
On layer 3:

Filter>Noise>Median>12 pixels
Blend Mode: Soft Light

Note: make all the layers visible to achieve the end result


Instant Watercolour Painting
I was having so much fun. Here's another one I did.

Beautiful BC Mountains
Just one more:

view from the tower in Policka
Policka, Czech Republic
I noticed the clouds disappeared so I may need to tweak some settings.
Clouds are back (I used cutout filter 8,4,2 instead of 4,4,2)

Wednesday, April 17, 2013

Faux Sketching or I Never Thought I'd Ever Use Gaussian Blur

I'm going to turn this photo of Tom Cruise into a sketch.


original
1. Duplicate Background (as usual)

2. Remove Colour
Image>Adjustments>Gradient Map>Black and White

3. Duplicate Layer

4. Invert Image
Image>Adjustments>Invert

5. Select Blend Mode: Colour Dodge (screen will turn white)

6. Filter>Blur>Gaussian Blur>12 pixels (6-12 pixels work best).

Note: Filter>Other>Minimum>1 pixel is done instead of the above step if you're "sketching" a photo that is anything other than a portrait, e.g. landscape.

7. Merge layers to a new layer by:
  • (Alt+Shft+Ctrl+E) which is the shortcut, or
  • Layers>Merge to a new layer while depressing Alt key

b/w sketch

To Add Colour:

8. Duplicate background layer

9. Move background layer above all others

10. Select Blend Mode: Colour, 50%
    coloured sketch
Who knew Gaussian Blur could be so useful?

Selective Colouring Using Layer Masking

Layer Masking can be used to "reveal" colour underneath.

First you have to turn a colour photo to black and white. There are two ways to do this and both methods use adjustments layers which create a layer mask over the image.

The adjustment layers are:

1. Hue/Saturation, or
2. Gradient.

Original
Method 1
  • Open the colour photo
  • Add a new Hue/Saturation Adjustment Layer above the photo. 
  • Move the Saturation slider all the way to the left.
  • Select the thumbnail and paint over the leaf with black paint. (Note: painting with white paint will cover up any mistakes) 
NOTE: Optional: If you want the screen "painting" to turn red, which is kinda neat actually, then Alt+Shift and click on the left-most thumbnail before you paint with black.

leaf shows through
Method 2
  • Open the colour photo
  • Add a new Gradient Adjustment Layer, Black to White above the photo.
  • Select the thumbnail and paint over the leaf with black paint. (Note: painting with white paint will cover up any mistakes)
NOTE: Optional: If you want the screen "painting" to turn red, which is kinda neat actually, then Alt+Shift and click on the left-most thumbnail before you paint with black.
this is more like true b/w and is created with Gradient

You can change the opacity of the paintbrush if you desire. Here I had my paintbrush set at an Opacity of 27% while painting over the geranium in black.


Reminds me of an old colourized photo
To give it an old-fashioned feel, add some noise by:

With the background activated, select Filter>Noise>Add Noise

5% Noise, Gaussian, Monochromatic

Hand Colouring a Black and White Photo

I started with a colour photo.
Original
Remove colour by, either:

Image>Adjustments>Gradient Map>Black to White

b/w

Or, another way to remove colour is by:

Enhance>Adjust Colour>Remove Colour

I find this one more grey than b/w
  • Add a plain New Layer above the photo
  • Use Blend Mode: Colour
  • Paint with orange paintbrush
100% opacity
Here's what it looks like with a reduced opacity:
70% opacity
Of course, I just had to posterize it.

I just love posterizing!

Tuesday, April 16, 2013

Merge Photos Together Using Layer Masking

Layer Masking can be used to merge photos together.

Merging Photos

In this example I took two photos and "merged" them together by using Layer Masking.


1. Open two photos and put each on a separate layer.
2. Insert a New Adjustment Layer>Level between the two photos.
3. Select the top photo, move it around where you want it, select Layer>Group with Previous
4. Select the bottom photo, move it around where you want it.
5. Click on the Layer Mask Thumbnail
6. Select Gradient Tool
7. Select Black, White
8. Using the gradient tool draw an arrow approximately where you want the photos to merge.
9. There will be black painted on the thumbnail in that location.